Honored to be featured as Pic of the Day on Vasari21.com Facebook Page

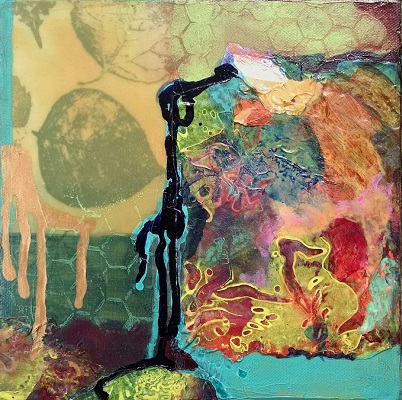
It was a nice little boost to see my painting, "Marvels and Mysteries IV" featured as the Pic of the Day on the Vasari21 Facebook page.  Arts writer Ann Landi , who created Vasari21, features several artists a week.  I was delighted when she contacted me to participate.  The site has a lot of great content for artists including articles and podcasts on topics such as interviews with artists, collectors, and public relations for artists, as well as Instagram for artists, pop-up shows, studio visits and much more.  

©Christine Sauer "Marvels and Mysteries IV" 20x20" acrylic on canvas 

STUDIO TIP #4

 Art Journals and Sketchbooks are Invaluable for the Creative Process   I have to admit that I have a love affair/addiction with art journals and sketchbooks.  The sketchbook/journal section of an art supply store always draws me in like a magnet.  It takes a lot of will power to resist buying more!  Sketchbook work was always part of my curriculum as an arts educator, even when teaching young students. Many years ago, one of my high school students who knew that I liked them even gifted me a large, beautiful, fabric covered journal that I still use today. 

Journals and sketchbooks are an invaluable part of the creative process. They are receptacles to collect the many thoughts, ideas and visual info that roll around in my mind.   I don't work in them sequentially but in a more random manner as the need arises.  In my stash, there's at least one for almost every kind of art related-purpose;  taking notes at art lectures, making paint sketches, paint recipes, title ideas for artwork, drawing, doodling and more. They are all shapes, sizes and materials. (photo below)  

©Christine Sauer , several journals from my collection

©Christine Sauer , several journals from my collection

The paint journals are used for warm-up paintings, as reference for palette ideas, to explore color mixing in a variety of ways and for experiments using paint offloaded while working on other projects.   I have competing tendencies/urges when painting so the journals are a great place to get some of that out of my system too!  Favorite types of journals are spiral bound with heavy watercolor or mixed media paper. (photo below)

©Christine Sauer,  paint journal experiments with acrylic paints.  STUDIO TIP:  Use wax paper or cooking parchment as interleaving to keep pages from sticking together.

©Christine Sauer,  paint journal experiments with acrylic paints.  STUDIO TIP:  Use wax paper or cooking parchment as interleaving to keep pages from sticking together.

I'm starting a new journal, one for mixed media collage using my stash of monoprints created on Gelli-plates.  Customizing the journal cover is so important as it sets the tone for the creative exploration and play inside.  I thought I'd share this super simple process that I used customize it.  I repurposed an old blank book made over twenty years ago at a bookmaking workshop, but any journal or sketchbook will do as long as paper and fabric can be glued to the surface.

Materials needed:  Golden Soft Gel Matte, old paint brush, a journal, scissors, variety of collage papers snd fabrics.  I like to use Matte Gel because it keeps the character of the paper and fabric and it's not sticky like the Gloss versi…

Materials needed:  Golden Soft Gel Matte, old paint brush, a journal, scissors, variety of collage papers snd fabrics.  I like to use Matte Gel because it keeps the character of the paper and fabric and it's not sticky like the Gloss version.

Step 1)    Brush one layer of Golden Soft Gel Matte (GSGM) over the whole cover to seal and let dry to the touch about 5-10 minutes.

Step 2)   Choose just a couple of the fabrics and papers you might like to use as a base layer and start auditioning them to find an interesting arrangement.  In this case I am using an informal grid to organize the design.  Cut your choices to size.  In the photo I used a piece large enough to wrap around the spine of the journal to reinforce it since the journal will be opened and closed often. Cut paper so that it will also wrap around to the inside of the covers for a more finished look.  Brush a generous amount of GSGM on the journal cover and paper for good adhesison.  Burnish by hand for good contact.  

©Christine Sauer, covering repurposed journal with monoprinted fabric and paper

©Christine Sauer, covering repurposed journal with monoprinted fabric and paper

3)  Continue layering with smaller pieces of monoprinted paper and fabric until the design is satisfying.  In this case elements such as the bubble wrap and stenciled prints were added for contrast.  The collage continued inside the covers as well.

©Christine Sauer, collaged front and back journal cover using monoprinted paper and fabric.

©Christine Sauer, collaged front and back journal cover using monoprinted paper and fabric.

4)  Finished book below.  Last step is to use a generous coating or two of GSGM on top of the collage.  This will protect the paper a bit and provide a good barrier surface if you want to add a bit of paint.  If you are interested in learning more about creating collage using monoprints join me for the "Collage Explorations"  Workshop on June 16 and 17, 2017,  at David Art Center, Metairie, LA

 ©Christine Sauer  Finished journal cover ready to go or additonal layers of text, paint or stencils can be added. STUDIO TIP: Use acrylic paints with a matte finish to avoid a sticky surface. 

STUDIO TIP #3

Use Pixlr to enhance your promotional materials and social media postings.  Pixlr is a free app that I downloaded to my Android device.  There's an online version too. It’s become a main go-to for a variety of applications. I use it creatively to generate new ideas for artwork. But for this post, I'm going to show how it can be used to create eye-catching images for both print and online use. 

It was possible to create very nice postcards with Pixlr photos using MOO for the printing.  This is pretty great ‘cause it saves lots of steps and time not having to take high res photos with a dslr camera for print purposes!!  Not to mention that it is a fun app to use.

On the right are a few screen shots from my device and some photos to show a bit of the process.

  • For this example I used the Collage feature in the app.  You can choose several photos from any Album on your device. 
  • I chose four recent works on paper paintings from the Camera Roll.  The app pops them into an arrangement that can be easily changed.  It’s fun to see all of the variations that are possible. 
  • I increased the space between images and made the corners rounded.
  • Once you have settled on a configuration that you like, click DONE.  Then save the image to your Albums or share with Facebook, Instagram and more. When posting to Instagram I often use it to show a variety of images or views. Super simple and fast!
  • Below are some arrangements I tried with work from my new website before settling on one that would be printed onto a postcard.
©Christine Sauer , postcard examples

©Christine Sauer , postcard examples

©Christine Sauer, postcard examples

©Christine Sauer, postcard examples

  • Here’s the final version that I had printed on a postcard by MOO.   Represented are 1-2 paintings from each of the Collections on my website: Marvels and Mysteries, Ebb and Flow, Energy and Movement, Earthy, and Circles.  https://christinesauerstudio.space
©Christine Sauer  Postcard Back,PS.  If you’d like one of these sweet little post cards, shoot me an email with your address. csauerarts@yahoo.com

©Christine Sauer  Postcard Back,

PS.  If you’d like one of these sweet little post cards, shoot me an email with your address. csauerarts@yahoo.com


©Christine Sauer, Collage Feature Pixlr

©Christine Sauer, Collage Feature Pixlr

©Christine Sauer, Pixlr screen shot

©Christine Sauer, Pixlr screen shot

©Christine Sauer, Pixlr screen shot

©Christine Sauer, Pixlr screen shot

STUDIO TIP #2

Make Creative Use of Your Paint Palettes!  If you have ever taken a workshop with me you know that I am a bit obsessed with not wasting art supplies. This includes extending the use of my acrylic paints.  Artist grade paints like GOLDEN, which is the brand that I use, cost a bit more so I like to get as much bang for my buck as possible.  Additionally, we are fortunate here in the US to have easy access to an abundance of quality art supplies.  There are many parts of the world where quality materials are not so readily accessible or affordable.  Therefore, I try not to take them for granted.  And, the less stuff that goes into landfills the better IMO.

After a few painting sessions paint palettes usually look pretty great.  Here’s an easy and creative way to use your paint palette after it has a few layers of paint on it.  You are going to make a paint skin out of it that can be used as collage material for use in other art work!  To do this, I use paper palettes from the art supply store, the waxy side of freezer paper, or large plastic baggies as palettes for painting.  What’s great is that not only can you use those gorgeous palettes that are created during the painting process, but you can also reuse your palette paper.

@Christine Sauer, polymer mediums for coating paint palette

@Christine Sauer, polymer mediums for coating paint palette

©Christine Sauer, brushing medium on paint palette

©Christine Sauer, brushing medium on paint palette


Pictured above is a recent palette after a few painting sessions with several layers of acrylic paint on it.  My preference is to use a palette with a variety of colors.  If you have a palette that is monochromatic that will also work.  You can always brush on extra color if desired.  To make the palette a bit thicker and easier to peel off of the backing without tearing, brush on a coat or two of polymer medium.  Here I’ve combined gloss and matte for a satin finish.  Let dry completely.

©Christine Sauer, peeled paint palette skin

©Christine Sauer, peeled paint palette skin

Once the coated palette is dry, take a pair of scissors or a utility knife and carefully cut through the skin on one of the corners just enough so you can grab the skin and start pealing it up.  Go slowly to so that you get a large piece without tearing it.  You’ll notice that the reverse side will have a uniform surface and may also have interesting color and brushstroke combinations that are usable.  It’s a twofer!

©Christine Sauer, pear shaped paint skin

©Christine Sauer, pear shaped paint skin

Pictured above, I cut the paint palette skin into a pear shape with scissors.   Adhere the skin to your painting surface by applying a liberal coating of Soft Gel Matte or Gloss to the back of the skin.  It may take a couple of hours to dry completely depending on temperature and humidity.  "Network II", pictured below, is a painting where I used a paint skin on the right-hand section as part of the overall design.  Paint skins can be used in a myriad of ways so give them a try!

*** Store them flat and individually between sheets of wax paper, parchment or sheet protectors.  I keep them in shallow drawers so as not to stack too many on top of each other.  Handle them carefully as they will stick to each other and are hard to separate without tearing.

©Christine Sauer “Network II”  8x8” , acrylic and paper on canvas

©Christine Sauer “Network II”  8x8” , acrylic and paper on canvas